|
Defensive Counter: Weight: 320 - RPs: 1600 |
DEPLOYMENT TEAM
|
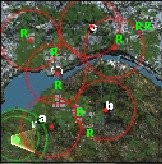
[By now you should have something like 2,000,000 C-bills and an incredibly packed mechbay full of awesomely customized spiffy death machines, as well as a collection of shiny 'n pretty medals 'n stuff. From now on, your only problem should be not overcooking too many enemy mechs and losing that salvage!!]
It seems as if House Steiner and House Liao have finalized their agreement and decided to deal with the insurgency on the planet. Your contract with the Resistance begins with a mission to protect the city of Bannikburg. But when you get there, you find out that it is already taken; now you have to get it back and keep it. There's a lot of territory to cover and not much time, but the rewards are great. Just another day in the life of a CO.
Start by running East towards SecOb#A, Headquarters. You'll stir up a pair of Starslayers and a Partisan or two. Deal with 'em. Then grab the HQ and swing North into the convenient fold overlooking the city. A Shootist there will try to mess with you; mess with him instead. Grab the Resource Building, then head South and find the other Resource Building, which has a Razorback and a few Hetzers guarding it. Then head North, through the city (or around it) and down to the river bank and West Bridge, where you'll find a Repair Bay and some Resource Trucks. You'll also find a pair of Hollanders and a few crawlers on the other bank, who will stir up when you go for the Bay. Kill them and then capture the West Bridge turret controls on the north bank of the river.
»»»»You must split up your forces here if you are to complete all the Objectives and capture all available Resources, of which there are an amazing amount ««««
»»»» Send a fast mech up North into the city and capture the Resource Building there. Then send it West and further North and capture another Resource Building there. Hustle it back to the safety of the West Bridge turrets.
Ask me again and I'll knock ya down...»»» A medium mech should head across the river. North and East is a fuel dump being tended by a Highlander and an Aerospotter. Use the fuel tanks to fry them; if they survive, get the Aerospotter first; those Shilone bombers can really give you a bad hair day (hopefully the Highlander is still in useable shape; if so, salvage and repair him). Then proceed Northeast until you get to the Sensor controls (SecOb#C); this is your main target. Don't worry, you'll only meet a few Hetzers and a Partisan. Grab the controls, then send this mech East to almost the edge of the map, where you'll find two Resource Buildings. Follow the road South and you'll find another Resource Building! (Now, unless your second team has already captured the turrets on the south side of the river here, you're better off running your mech back to the West Bridge turrets along the north side of the river. Start a couple Minelayers doing their thing just outside and to the west of the turret controls if you like.)
Throw another 'pult on the Barbie, will ya mate?»»» The main team heads East and North South on the south side of the river to a point about halfway between SecOb#B, the Power Generator, and the river. Make sure not to get too close to SecOb#B; we want to leave that alone for now.
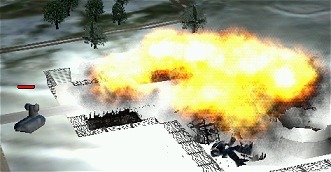
Keep angling East towards the bridge there. You'll meet a few ground vehicles, and see an ammo dump. Run and blow the dump quickly; the 2 Catapults in it will probably not even have time to power up before they are permanently powered-down. If not, they'll at least be severely damaged. Head further North, and grab both sets of turret controls that overlook the river and East Bridge (if you are going to lay mines on the riverbanks, this is the time to fly in the Minelayers and start them working). Hustle this Away Team back to join the mechs at the West Bridge turrets.
Standin' in the shadows of love...By now you've been getting sensor readings. If you've kept your speed up, your entire team will be together to meet the first wave of attackers, which come in from the Northwest and make for West Bridge (You might also have added a Starslayer or Highlander to your main team by now). First several ground vehicles including LRMs will come through, followed by 3 Sha Yu and a Lao Hu with Attack Chopper escorts. Let the turrets help you against the crawlies and the choppers; concentrate on the LRMs and mechs. If you take the Lao Hu with a head shot, he makes a valuable addition to your current team strength.
Now from the Northeast comes a wave of LRMs, 2 Razorbacks and two Shootists, who cross the river and make for the left-hand (northwest) turrets at East Bridge. While you are tangling with them, 2 Men Shen and a Raven might sneak downriver on the North bank and make for your hard-won West Bridge turrets, so leave behind a small group to deal with them. They might also join the assault on East Bridge so watch for them; they're running ECM and hard to spot.
After you are barely done with this wave, a third wave comes again from the NorthEast: 4 Sha Yu and 2 Hunchbacks, who might make for the right-hand (easternmost) turrets; or who might jump the river between the turrets and go either way. You might have enough time to hustle the small group holding West Bridge to help you if they have dealt with the ECM trio.
Dance! Dance, little sister, dance!After this third wave, hustle on back to West Bridge, because the last wave is coming there from the Northwest - 2 Hollanders, 2 Catapults and an Atlas (they might even be there, depending on how fast you take out the third wave) preceeded by a couple LRMs, who will destroy the empty Resource Building in the city just from spite! If you have a spotter mech on that side of the river, take out the LRM trucks and then vamoose.
It's huge fun to watch the Catapults get crippled in the minefield; the Hollanders are too light to trigger mines so prioritize their target-ness. When you destroy the Atlas, the mission is over; unless, that is, you left SecOb#B, the Power Generator, until now 😊
If you haven't used all your RPs, use them now and salvage the heaviest/most expensive mechs; start with the Atlas of course. If he's in the minefield, be sure to use Force Fire to clear a path for him before you revive him; you'd kill yourself if a mine destroyed him.
The last vehicle and powered-down Starslayer are at SecOb#B; kill them and then the mission's over. If you salvaged well and can afford all the other mechs from the After screen, you can make double your current C-bill balance on the next sellback. Who says being good doesn't pay? Take that, Diaz 😛
[Dagger made Ace; Steel made Elite]


Written by relayer. Preserved here as part of the-spoiler.com archive. Original source: The Spoiler.